Tuesday, December 7, 2010

Betisor Tirolez


Betisorul tirolez este un accesoriu extrem de popular in tarile vestice si se foloseste, de regula, in combinatie cu o lanseta bologneza (varga cu inele de 4,5 sau 6metri) la asa-zisa tehnica de pescuit "la pipait". Practic, betisorul culiseaza pe linia principala si tine momeala cat mai aproape de substratul apei. Ideea este aceea ca, mai ales pe raurile cu un curs extrem de rapid, pastrarea unui carlig cu viermusi sau rame aproape de fundul apei este imposibila, decat in varianta cu plumb fix. Betisorul tirolez se bucura de o mobilitate mai mare decat plumbul fix si poate practic evolua pe substrat prin recuperare lenta (ture scurte de manivela). Specii tinta pentru acest stil de pescuit sunt: mreana, cleanul, scobarul, morunasul si alte specii care vietuiesc in ape cu un curs rapid

In tara noastra, pe langa folosirea in combinatia cu lanseta bologneza, betisorul mai este folosit si de catre pescarii de rapitori, cu preponderenta pe lacurile de acumulare pentru a pescuit cu naluca (vobler, oscilanta) la adancimi cat mai mari, mai ales cand temperatura apei este in scadere. In ambele cazuri, montura este extrem de simpla: carligul cu momeala sau naluca raman in capatul liniei principale, deasupra careia la aproximativ 20 de centimetri se fixeaza un opritor (cauciuc)

Wednesday, December 1, 2010

Cicada

Culoare , 01-Gold ,02- Nichel,03 Fire-Tiger,04-Rosu, 05-Red head , 06 Alb, 07 Green-Tiger, 08 Yellow-Tiger,

CICADA – o naluca metalica versatila, ce poate fi folosita in orice fel de apa, fie curgatoare, fie statatoare, in orice anotimp, primavara, vara, toamna, chiar si iarna la copca, eficienta la toate speciile de pesti rapitori, in toate straturile, din apropierea fundului, intre ape si la suprafata.

Naluca vibratoare alcatuita dintr-o lama metalica lestata in partea frontala fata de sensul de tractiune avand o miscare de vibratii compusa intre o miscare puternica stanga-dreapta in plan orizontal cu o miscare usoara in plan vertical. Vibratia se datoreaza echilibrului instabil in care aceasta se afla in timpul deplasarii prin apa (al tractiunii) si al tendintei restabilirii acestui echilibru

Monturi - Poze

Montura Helicopter
Montura Plumb-Pierdut

Montura - Forface

http://www.horcarp.ro/monturi
http://www.horcarp.ro/forfacuri


http://www.horcarp.ro/monturi
http://www.horcarp.ro/forfacuri

Monday, November 29, 2010

Marimea plutei - viteza apei - Greutatea plumbului

http://www.pescuitul.ro/ps/page.php/id/pluta/nav/1/

Atunci cand avem o varga si dorim s-o dotam cu o linie noua, primul lucru la care ne gadim este ce fir luam, daca acesta rezista la solicitarile capturiilor pe care ni le dorim in juvelnic; apoi urmeaza carligul: cat de mic sa fie, ce culoare. Deseori, pe ultimul plan este lasata pluta si apoi plumbii. Numai ca sunt situatii cand reusita unei partide este hotarata chiar de acest ultim element - pluta - care are rolul de semnalizator care ne avertizeaza, mai mult sau mai putin eficient

, ca pestii ataca momeala.

In functie de pretentiile noastre de natura estetica sau functionala, pluta poate fi realizata din materiale primare (varful unui cocean de porumb, o pana de gasca etc.) sau materiale compozite (lemn

de esenta speciala, plastic, pluta, teava de ac de seringa). Partea din pluta care ramane deasupra luciului apei se numeste antena. Mai departe, in functie de distanta la care pescuim si de acuitatea noastra vizuala, antenele plutelor vor fi viu colorate, asa incat sa existe un contrast suficient intre culoarea apei si culoarea antenei. Cand distanta este mai mare acestea pot fi prevazute in varf cu o bobita viu colorata realizata din polistiren expandat sau plastic. Cea mai importanta cerinta pe care toate plutele trebuie sa o asigure este flotabilitatea.

Odata aleasa, pluta trebuie lestata cu ajutorul unor plumbi calibrati, asa incat aceasta sa aiba o pozitie in general verticala pe luciul apei. Plutele de firma

au marcate pe corp si antena o serie de repere care ne indica nivelul optim de scufundare, fiind inscrisa si greutatea plumbilor pentru lestare. Insa ce nu se stie este ca forma plutei joaca un rol esential in viteza de reactie a acesteia (durata timpului de revenire la suprafata) atunci cand pestele trage. O pluta scufundata care revine foarte repede in pozitia initiala va fi denumita "pluta rapida" iar in cazul opus, cand revine mai lent la pozitia initiala, o vom denumi "pluta lenta". O pluta rapida este caracterizeaza de o forta arhimedica mare ceea ce presupune ca la scufundare pestele trebuie sa traga serios de momeala. Daca pestele este rapitor atunci totul este in regula, acestia fiind mai agresivi; daca pestele este pasnic, este foarte probabil ca acesta sa se sperie de rezistenta ridicata opusa de pluta si sa lase imediat momeala. Ne propunem in continuare sa explicam fenomenul fizic care sta la baza proiectarii plutelor. Teoria are la baza legea lui Arhimede care spune ca asupra oricarui corp scufundat intr-un lichid actioneaza o forta de jos in jus a carei marime este data de greutatea volumului de lichid dezlocuit de acel corp.


Un model simplificat, dar destul de precis, este prezentat in fig. alaturata. In timpul pescuitului, pluta este supusa actiunii a 2 forte importante:
1. Greutatea ansamblului pluta-fir-ac-momeala-plumbi de lestare (G);
2. Forta arhimedica (A) care actioneaza asupra plutei.
Diferenta dintre A si G, proiectata pe axa X (vezi figura alaturata), ne da rezultanta (N), care poate fi orientata in sus (cand A>G - lucru de dorit), in jos (pentru G > A - caz nedorit pentru pescuit) si cazul particular N=0 (cand G=A, pluta este aflata in echilibru). Primul caz (N>0) este cel vizat de orice pescar, adica atunci cand pluta invinge greutatea lestului. Marimea rezultantei N ne da tocmai acceleratia cu care pluta revine la suprafata apei.
Aici intervine un paradox: vreau ca N > 0 (adica sa vad pluta deasupra apei) dar N > 0 inseamna o rezistenta opusa de pluta care ar putea fi simtita de peste, in sens nefavorabil. Daca N scade foarte aproape de zero pluta poate reveni foarte greu deasupra apei, ramanand mai mult timp scufundata desi pestele poate intre timp a lasat momeala. Care este compromisul optim ? Aici intervine maiestria fabricantului. Analizand cele doua forte, G (greutatea) poate fi considerata constanta, in timp ce a doua (A) se modifica in momentul in care pestele trage, dupa o lege ce tine cont de forma si marimea partii nescufundate a plutei. Nu vom insista asupra partii de calcul matematic insa vom prezenta concluzia finala care arata ca forma ideala a plutei este cea a picaturii de apa aflate in cadere, prevazuta cu o antena supla, colorata pe tronsoane in mai multe culori vii (galben-rosu) - vezi fig. de mai jos.


Dupa cum observati, pluta are o forma ce se poate reduce

la doua figuri geometrice: o semisfera si respectiv un con. Avantajul acestei plute este acela ca asigura o flotabilitate stabila iar volumul
mic situat deasupra nivelului apei determina o crestere optima a fortei arhimedice atunci cand pestele trage, asa incat pluta nu este simtita de peste. In functie de gustul nostru, semisfera de baza poate avea un diametru mai mic incat pluta va fi mai supla, caz recomandabil pentru o lansare usoara la distante mari. O forma deosebit de eficienta este si aceea a unui elipsoid de rotatie cu raport mare intre cele doua axe ale sectiunii longitudiale (vezi prima figura).
Cercetarile efectuate au demonstrat ca partea din pluta situata deasupra apei (exceptand antena) trebuie sa fie de cca. 10-15 % din inaltimea plutei (se considera ca momeala este in carlig). Pentru pestele rapitor agresiv aceste recomandari nu mai sunt valabile. Din contra, pluta se poate folosi in pozitie inversa, cu semisfera deasupra.

Ultima faza este aceea a echilibrarii plutei cu ajutorul unor bilute de plumb, fixate pe fir la cca. 5-10 mm deasupra carligului. Pentru cazul pestilor pasnici, vom adauga bilute pana cand corpul plutei va fi scufundat in proportie de cca. 85-90%. O astfel de pluta va avea o viteza de reactie suficient de buna si nu va deranja pestele in timpul atacului. Modul de lestare nu este chiar intamplator. Atunci cand pescuim pe fundul apei, pestele are tendinta sa ia momeala si sa urce spre suprafata. Spunem ca "a pus-o pe lat". In acest caz pestele ridica spre suprafata plumbii lasand pluta fara contra-greutate. Daca plumbii sunt mai grei, unele specii de pesti de talie mica ar putea simti greutatea plumbilor si deseori lasa momeala si pleaca. Pentru a atenua acest soc se recomanda o lestare graduala, in 2-3 trepte, ca in fig. alaturata. Astfel, imediat langa carlig punem un singur plumb, mai usor. Urmeaza apoi ca la 3 cm sa mai adaugam inca 1-2 plumbi si ultima treapta, de sus, restul plumbilor. Lestarea graduala este deosebit de eficienta mai ales la pescuitul caraselului, la rosioara, babusca. Un alt avantaj este acela ca pluta se inclina treptat anuntand din timp intentia pestelui. Trebuie subliniat si un mic dezavantaj al lestarii graduale si anume acela ca in timpul lansarii sau la intepaturile ratate plumbii se pot incurca intre ei formand uneori noduri.

Concluzii:
- o pluta de calitate are forma corpului asemanatoare unei picaturi suple de apa aflata in cadere, cu antena subtire, eventual cu o "perla" viu colorata in capatul superior al antenei;
- pentru pestii pasnici, corpul plutei de forma optima va fi scufundat in apa in cea mai mare parte (85-90%), pentru a reduce rezistenta opusa de pluta in timpul atacului;
- pentru pestii rapitori pluta va fi scufundata in proportie de max. 80 %, restul de 20 % cotribuind la cresterea rezistentei opuse de pluta in timpul scufundarii, in vederea autointeparii;
-lestarea eficienta

se face gradual, cu mai multi plumbi plasati pe fir in mod echidistant.

Thursday, November 25, 2010

Feeder Rig


Maggot Feeder Rig

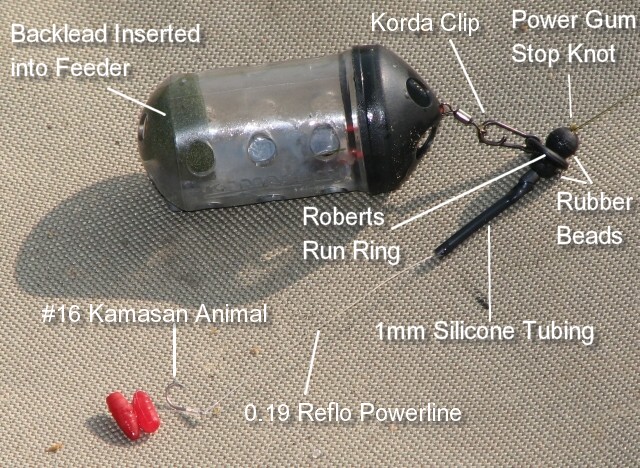
Last year I was using a helicopter variant as my maggot feeder rig, but changing hooklinks was a bit of a pain and I was never convinced that it was all that good a rig anyway. Although this one uses more components than I'd really like it is pretty simple, and easily converted to a straight leger rig. I don't like quick-change connectors between my main line and hooklink, preferring to retie the knot. It takes only a few seconds longer, ensures that the knot isn't neglected and makes the rig more streamlined. Click on the pictures to enlarge them.

The feeder is a 30gm Kamasan Blackcap, and the backlead shoved inside it is around 30gm too. This makes for a feeder that flies well, is heavy enough to tighten up to without moving and which still sits horizontal on the lake bed. Using a sliding Powergum Stop Knot to trap the Run Ring between two beads makes the hooklink stand out from the main line on the cast, and gives me the option to quickly change to a free running rig should I so desire - by sliding the knot up the line a few feet.

For what it's worth I have been using Daiwa Infinity Duo as mainline, in the 0.285 diameter. I quote the diameter because this line is IGFA rated at 12lb, so it will break below that. I have heard it said that Duo is bad for line twist, but I have actually found it to be less prone to twisting than Sensor. Maybe it's the fact that the two-tone colouration of the line that makest he line twist readily visible that has given Duo this reputation?

It was the limpness of Duo that attracted me to it in the first place, and it has proved good in that respect once loaded on the reels, and it seems pretty abrasion resistant too. Reflo Powerline has been a good reliable hooklink material so far, in both 0.19 for the casters and 0.21 for corn. It's maybe not as limp as it could be in short lengths, but it is very clear and I can't see the need to delve into the murky world of fluorocarbons when this stuff is avialable.

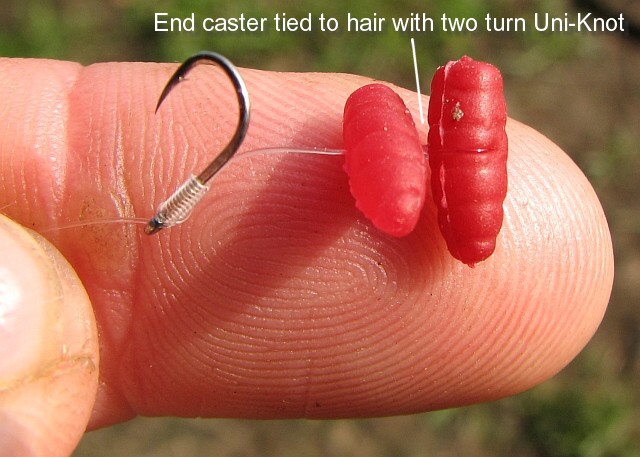
One thing I don't like about using plastic baits is trapping them on the hair using a bait stop. It looks kind of clumsy, although I know full well it doesn't put the fish off. Even so I have had problems with artificial baits falling off the hair, so when using casters and pellets I tie them on to the hair. That way they ain't going nowhere!

While I have read that Kamasan Animals are not particularly sharp hooks, my experience has been different. Even so, it's no great hardship to run a file over a hook if the point is not up to snuff. When I want to use a small hook the Animal is the one I go for.

Saturday, November 20, 2010

FIRUL DE PAR AJUSTABIL

Foto 1:
- Pentru inceput, legati carligul la struna aleasa ( pentru claritate, in fotografie am executat struna cu material galben)

Foto 2:
-Folosind nodul Uni Knot legati o portiune a firului de par in jurul strunei, apoi strangeti nodul bine si tundeti portiunea firului de par dinspre partea catre vartej a rigului. Treceti cealalta parte a firului de par prin ochetul carligului.

Foto 3:
-Pozitionati niste tub termocontractil peste ochetul carligului si efectuati strangerea termica.

Foto 4:
-Legati o bucla pentru boilie pe firul de par.

Foto 5:
-Adaugati momeala.

Foto 6:
Daca aveti nevoie sa lungiti firul de par, pur si simplu trageti de bucla pentru boilies iar nodul UNi Knot va aluneca de-a lungul strunei.

Foto 7:
-Asta va permite de asemenea sa puneti momeli multiple.

Monday, November 15, 2010

Hook Parts (Elemente Carlig Pescuit)


www.horcarp.ro

www.horcarp.ro

Marimea carligului si diametrul boiliesului

Pentru a face o alegere corecta a marimii carligului, aceasta trebuie corelata cu dimensiunea momelii si cu marimea pestelui vizat. Uneori pot aparea discrepante intre aceste elemente principale. Va prezint cativa din factorii care ne fac sa deviem de la formula standard. Anotimpurile ne determina sa schimbam marimea carligului si a momelii, in functie de activitatea de hranire a crapului. Dimensiunile scazand in anotimpurile reci si crescand in cele calde. Presiunea asupra unei balti pescuita intensiv, impinge pescarul de nenumarate ori, sa recurga la diferite strategii salvatoare. In astfel de cazuri se poate ajunge la scaderi ale marimii carligului de pana la 8 sau 10 si utilizarea boiliesurilor de numai 8-10mm.

Inca o strategie care imi place sa o amintesc, de cate ori am ocazia, este aceea de a incalca standardele si de a pescui diferit fata de ceilalti pescari de pe balta. Cu boilie de 15mm si carlig numarul 4, sau cu un carlig numarul 8 si boilie de 20mm, avand insa grija la distanta dintre boilie si curbura carligului. In anumite cazuri sau pe anumite balti poate fi solutia castigatoare.

Alegerea marimii carligului in functie de diametrul boiliesului

Ca o sugestie pentru corelarea marimii carligului cu diametrul boiliesului, va prezint un tabel cu cele mai utilizate dimensiuni, in pescuitul crapului:

Marime carlig |

Diametru boilie

2

22-26mm

4

20-22mm

6

18-20mm

8

16-18mm

10

14-16mm

Friday, October 22, 2010

Linie pentru somn mare, cu fir textil

Materiale folosite : - fir textil aproximativ 70 cm .
- trei agrafe rapide .
- cca 15 cm nichelina sau sarma otelita 0,5 mm .
- doua tuburi pvc . unul de cca 5 - 6 cm , altul cca 2 cm .
- doua plute de 2 - 2,5 g fiecare , ovoide sau sferice .
In foto am folosit plute color . Recomand insa ca acestea sa fie inchise la culoare .


Pe firul textil cu agrafe la ambele capete insiram plutele si tubul scurt de pvc . Acestea, conectate intre ele, culiseaza de-a lungul firului. Sarma, indoita la jumatate din lungime, o introducem in tubul lung de pvc. In bucla sarmei, la unul din capetele tubului atasam agrafa pentru carlig . Celelalte doua capete le atasam prin rasucire de tubul scurt dintre cele doua plute.

LEGAREA CARLIGELOR DE PESCUIT

Toti pescarii de pluta, fie ei de plici, varga, rubeziana sau bat cu inele, iarna si primavara, stiu ca trebuie sa foloseasca monturi cat mai fine. De asemenea cei care au pescuit la oblete, rosioara, au fost pusi in situatia de a lega carlige cat mai mici. Pana pe la 12-14 mai merge. Cum merge insa de la 16 in sus, cand incepe distractia. Daca mai ai si degetelele groase, ala esti. Noroc cu o scula de legat care face toti banii si careia eu ai spun LEGATORUL. Este vorba de asa ceva ...


Am ales pentru demonstratie un carlig de 12, fir de 0.20 , pentru ca acestea sa fie vizibile in poza


Prima data se pune carligul in deschiderea legatorului strangandu-se apoi de rotita astfel incat sa ramana doar tija afara. Se strange destul de ferm, fara a exagera, astfel incat carligul sa nu aibe mobilitate


Apoi se impinge catelul metalic peste rotita de strangere, pe partea opusa celor doua "carlige curbate". Spre varf se afla cel lung , iar spre maner, cel mai scurt


Acum, firul(putin tensionat)care vine direct din fata legatorului se trece peste cele doua extremitati ale catelului, fiind intors inainte paralel cu directia de unde vine, dupa cum urmeaza


Incepem apoi rasucirea legatorului,astfel incat firul intors sa prinda atat tija carligului cat si firul direct. Rasucirea se face de 7-8 ori. Functie de tija se dau pana la 10 ture


Acum intoarcem capatul liber pe dupa tija cea lunga din varf a catelului, dupa care apasam catelul inapoi in pozitia de la inceput


Slabim putin rotita de strangere si scoatem tragand de firul principal carligul gata legat


Rezultatul final, asta este! Sper sa va fi ajutat cu ceva


Montura Drachkovitch - Montura pentru salau, stiuca .

Montura Drachkovitch, este o montura cu pestisor mort, folosita cu precadere pentru pescuitul salaului . Aceasta mai poate fi folosita cu succes si atunci cand pescuim la stiuca .

Plumbul sferic este pozitionat excentric, avand libertate de miscare, ceea ce asigura pestisorului mort atasat, o evolutie cat se poate de naturala. Pentru prinderea pestisorului, se introduce tija elastica prin gura, apoi se infing cele doua ancore lateral, de o parte si de alta. Tripla finala se fixeaza pe coada pestisorului, apoi prin ajustarea lungimii strunei de kevlar, i se asigura pestisorului o forma usor curbata . Acest lucru, face ca evolutia monturii in apa sa fie sinuoasa, fiind foarte atractiva pentru pestii vizati.

Montura Drachkovitch se foloseste in combinatie cu o lanseta rapida, de 2.40-2.70, avand o puterea corespunzatoare pentru montura folosita. Modul de pescuit este apropiat celui la jig-uri.


f

Thursday, October 21, 2010

Resistance-free running rig for big perch (Salau)

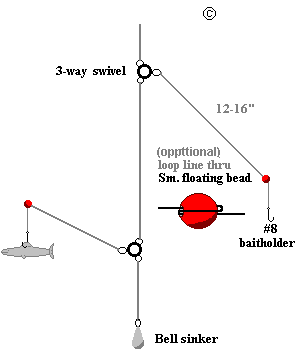
This is THE rig to use if you are targeting specimen perch. Although it’s quite simple to tie, the components you will need are quite specialised but can be bought from all good tackle shops.

A Run Ring is a must because this provides a large diameter bore through which the line passes, therefore resistance is kept to a minimum. Big perch will drop a legered bait if they feel the slightest resistance.

The Run Ring will need covering with some silicone tubing to prevent tangles, and then a snap link swivel can be clipped to the Run Ring so that any weight of lead can be used quickly and easily.

The best hooklength lines should be soft, supple and camouflaged – either a braid or clear mono is ideal. Length needs to be between 2ft and 4ft.

One of the best baits for big perch is a couple of lobworms, so this means that the hook will need to be quite large. A size 4 wide gape will be ideal, preferably barbed so that the worms remain on the hook.

A Use a Run Ring followed by a bead and a swivel. The Run Ring reduces the amount of resistance to the taking fish.
B The size and weight of lead ought to suit the distance that you intend casting. You could switch the lead for a feeder crammed with red maggots or chopped worms if you wish.
C It’s best to incorporate a snap link swivel into this rig so you can change the lead quickly at any stage during the session.
D Use a large swivel and a very strong knot to lock on your hooklength as there’s every chance you may encounter a large tench, carp or bream fishing with this rig.
E Hooklengths need to be strong and short – 2ft to 4ft is ideal and between 4lb and 8lb is best.
F When fishing with two lobworms hook them in the saddle with a wide gape size 4 hook.
G Chop and change your baits between using whole lobworms and broken lobworms to find out which bait the fish respond to best.

Perch Rig (Montura Salau)

Groundbait feeder rig for river barbel, chub and bream

This simple yet very effective feeder fishing rig is perfect for catching river barbel, chub and bream. It’s easy to make and can be used in deep sluggish rivers through to fairly shallow and swift flowing rivers.

The beauty of this rig is that it can be used to catch all of our larger river species, providing you use an appropriate bait and loosefeed to tempt them.

All you’ll need to tie this rig is a variety of different weight of feeders, some eyed hooks, some hooklength braid, strong mainline, a snap link swivel and a buffer bead.

Buffer beads are small rubberised sleeves that fit over half of a swivel. They can be found at all good specialist fishing tackle stores and are ideal for stopping your swivel from hitting knots and potentially weakening them.

The most important part – and often the most technical – is choosing the right weight of feeder. The feeder must be an open end type. Cage feeders simply release their load of groundbait too quickly, whereas open end feeders hold on to the groundbait until the feeder hits the river bed.

Getting the right weight of feeder requires a few experimental casts. Pick a feeder that you think might offer enough weight to hold still in the flow, cast it out and see if the feeder remains static on the bottom. Ideally you should choose a feeder that only just holds still in the flow – one that will easily dislodge and begin rolling if a fish were to pick up the bait and nudge the feeder out of position.

Two of the best baits for this rig are either large drilled halibut pellets or fishmeal boilies – bream, barbel and chub love them. But you could use maggots, worms, casters, sweetcorn, anything you wish.

The feed you put inside the feeder ought to match the hookbait you’re using. If you decide to use a halibut pellet or a fishmeal boilie on a hair rig, you will do best to use a fishmeal groundbait and pellets in your feeder.

HOW TO TIE THIS RIG

A – Larger baits like pellets and boilies should be hair-rigged. You’ll need a strong eyed hook for this and the best way to tie a hair rig is to use the knotless knot technique here.
If you intend to use more conventional baits, just choose a strong hook of a size to suit your chosen bait.

B – It’s your choice whether you decide to use a mono or a braid hooklength. If you decide to use a mono hooklength pick one that will cope with a barbel, so 6-8lb breaking strain will be ideal. If you opt for braid, chose a 12lb breaking strain.

C – Your loosefeed should match your hookbait. Fishmeal groundbait and pellets is an ideal match for boilies and drilled halibut pellets. This combination scores well for river specimens.

D – Your open end feeder should have enough weight in the lead to just hold still in the river’s flow.

E – Use a quick-release snap link swivel to attach the feeder, and a buffer bead to attach your hooklength.

F – Your mainline needs to be strong enough to cope with a big barbel, so choose 8lb or 10lb breaking strain.

Snag-free link legering rig for big barbel and chub

Barbel love to hide under or tight to streamer weed, sunken branches, tree roots and other submerged obstacles. That makes catching them really difficult.

Static leger rigs may seem to be the answer, but often they aren’t. A mistimed or an inaccurate cast might see the heavy rig land bang in the middle of the obstruction – not only snagging up, but also disturbing the fish in the swim.

If you’re overly tentative with your cast, your rig might land too far away and the barbel won’t want to move out from the sanctuary of the feature to take the bait, especially in daylight hours.

These are the times when a neat link leger rig really comes into its own.

A correctly balanced link leger not only allows the angler to reach the desired distance upon the cast, but it also allows you to let the bait trip gently downstream.

No longer will you have to accurately cast your rig onto an area the size of a dinner plate. With a link leger you can cast upstream of the fish-holding spot and gradually work it downstream right next to or even underneath the feature.

The key to a successful link leger rig is to use the right amount of weight upon the link. Basically you’ll need to squeeze enough split shot onto the link to ensure that the rig sinks quickly and just holds the bottom when the rod is placed upon the rests.

If you leave the rod alone, the rig will remain in place until a fish takes the bait or a large twig or strand of weed hits the mainline as it is swept downstream.

But if you gently lift the rod tip to dislodge the rig it will rise up off he bottom and be swept downstream a little closer to the snag. Now place the rods in the rest ready to detect your next bite.

You can slowly and steadily repeat this until the rig lies exactly where you want it to be.

But this link leger rig offers something a little unique. The split shot can quite easily fall off the link if they become snagged, therefore this rig is very fish-friendly and safe. It’s the perfect rig to use when you’re fishing very tight to snags.

HOW TO TIE A LINK LEGER RIG

You don’t need a huge array of tackle to create this rig. You will need some large split shot, your hook, your chosen hooklength material (braid or mono), strong mainline (around 6-8lb is ideal), a strong swivel and a swivel bead.

A – Your hook needs to match the species and the size of bait you are using. When fishing for barbel, use a very strong hook

B – Your hooklength needs to be strong enough to cope with the fight of a barbel. If you decide to use mono, opt for lines in the region of 6-10lb breaking strain. If you decide to use braid to camouflage it against the venue bottom, use 12lb breaking strain.

C – The best method of connecting your mainline to hooklength is to use a swivel.

D – A swivel bead is the perfect accessory for attaching the leger link. Thread your mainline through the bead end and thread 6ins of strong line through the swivel. Fold this line over and lock the two lengths of line together using enough split shot to hold the rig onto the bottom. The beauty of this style of creating a link leger is that the split shot can quite easily fall off the link if it becomes snagged, leaving you free to play the fish back to the net.

E – Your mainline needs to be reliable and strong. 6-10lb breaking strain is ideal for most barbel fishing situations.

Barbel Rigs (Monturi mreana)

image One of Dave Burr's barbel rigs

Following a forum thread about running barbel rigs Dave Burr reveals what he uses.

As there are always newcomers to barbel fishing and of course, FishingMagic, the question of which rig to use is frequently asked. In an attempt to help the new guys and to get them on their way to fishing with an effective and above all safe rig, I have tied a few up and will describe them here. All of the examples here have been tied with fluorocarbon but you can use any hooklink material such as braid, mono, coated braid, etc.
Before you put any rig in the water ask yourself the questions, 'Does it do what I want it to do?' And 'Can a fish free itself from it in the event of a break-off?'

Rig one is a straightforward rig that has accounted for thousands of barbel and which is probably all you will need for your first season or two.

Dave Burr's Barbel rig

Rig 1

Your first requirement is a good hook. There are plenty of excellent patterns on the market, I suggest you pick one or two from recommendation and see how you get on with them, you will soon find a pattern that catches for you and thereby will give you the all important confidence.

On this rig the hooklength ends with a swivel, above that on the main line, is a couple of soft rubber beads to protect the knot from the link swivel. They will also give a degree of 'stand-off' which will help to reduce the number of tangles; trust me, if your line twists around your swivel and a barbel runs, it will crack the line off in a nano-second.

This rig can be used with any size of hooklength from three inches to three foot.

Easy isn't it?

Dave Burr's barbel rig 2

Rig 2

On the second rig the rubber beads have been replaced with a tail rubber which has the same effect but which covers the swivel and gives a more rigid stand-off, this is far more important when feeder fishing. The choice between either beads or tail rubber is entirely personal one, try them both then see which one suits your fishing the best.

Dave Burr's Barbel Rig 3

Rig 3

The third example is the rig that I have been using for the last season or so, it is simple but highly effective. Instead of a swivel at the end of the hooklength I use a quick-link , the hooklink is attached to that by simple figure of eight loop and enables a rapid change of hooklink should it be needed. The main line is tied to the link and a Korda anti-tangle sleeve is pulled over the top of it. To attach the lead I simply take the link from a link swivel (these can be bought separately in packets of ten) and fold it over the sleeve. The critical part of this is to make sure that the link only just grips the sleeve and will pull off easily. If you ram it on farther up the sleeve it will grip the main line and should you break off above the rig you will have created a tether rig that a barbel will not be able to rid itself from and it will then surely die.

So, I will repeat, make sure that the sleeve can still run on the line with the link attached, it may take slight effort to move it but at least it will slide. You now have a rig that is quick and simple to tie, offers terrific stand-off qualities and is semi-fixed and highly effective at hooking fish.

You will note that none of my rigs incorporate a stop bead or float rubber above the lead, I do not think that it is necessary as there is sufficient pressure from the fish pulling the line and lead to set a hook. Any rig with a back stop runs the risk of it becoming a tether rig whereas my rig, even if the lead clip is set too hard, still give a fish a chance to rid itself of it.

There are other rigs, some are more complicated and all will take fish but if you tie up any of those demonstrated here you will take all the barbel you want. Just remember, use sharp hooks and tie good knots, if you have any doubts about any of your knots don't hesitate, cut them off and tie them again, that few seconds could save you from months of regret when you lose a biggie.

And last of all I will remind you of the comment at the beginning. Before you put any rig in the water ask yourself the questions, 'Does it do what I want it to do?' And 'Can a fish free itself from it in the event of a break off?'